6 minutes read


I’ve been reading about ways to organize my thoughts, trying to be more productive and more conscious about the tasks that I tackle. And, after having a try at Kanban, GTD and others — and not adapting well to them —, I decided to try Bullet Journal, also know as BuJo.
Bullet Journal
The definition of Bullet Journal, by the creator himself, is “the analog method for the digital age that will help you track the past, order the present, and design your future”.
Bullet Journal site.
The problem about this definition is the word “analog” which, in other words, means to me:
- Not available at all times;
- Can’t be backed up in an easy way;
- Has an irregular input method (My writing is not the prettiest thing in the world…).
The idea of Bullet Journal being an analog media is intentional, however, and has its pros:
- Doesn’t depend on an internet connection or even any kind of power;
- When you are writing analogically, people say that you are being more thoughtful and conscious about what you’re writing.
Despite that, I choose to try to adopt it because:
- It’s highly customizable: nothing is predetermined, nothing is mandatory;
- You can use it to pretty much anything:
- Organize your daily tasks and to-dos;
- Log activities and facts;
- Taking notes of ideas and thoughts;
- Compile lists;
- Track down habits;
- …and pretty much anything else.
Trying it, the digital way
But, as I said earlier, the “analogic” part of it bothered me. And that’s when I thought: can’t I make it digital?
My requirements for it were:
- Inputting on it should be simple, not getting in the way of the information;
- Despite the fact that most Bullet Journal users love to decorate their journals, I’m a fan of clean and concise design, so my tool should have a little bit of customization, but not much would be needed;
- Should be available everywhere I have an internet connection (pretty much everywhere where I am daily);
- Should be easily exportable.
I searched for people which were trying to do the same and, for my surprise, I found them. The three most common ways that people use to create an online BuJo are:
- Evernote: I never been a fan of it, but looks like this is the most common way of going digital;
- iPad softwares, like GoodNotes, Noteshelf and Notability: probably it’s one of the best and most appealing ways to create a digital Bullet Journal, and it would me my choice if I could. But, despite the fact that I can’t afford an iPad at the moment, taking an iPad (or any valuable stuff) with me in my day to day routine would be kinda risky, as I don’t live at the safest of places at the moment;
- Bullet Journal apps: they usually follow an specific interpretation of BuJo, which makes them not that customizable.
Thinking about the tools that I had around, I tried starting a Bullet Journal on a Google Docs document. It had a summary, and each of its pages were equivalent to an analogic page. I tried using it for about 3 months, but as it grew in size I found it harder and harder to manage. Even adding anchors to specific chapters didn’t make it easier to use.
After giving some thought about it — and not willing to give up on the idea of a Bullet Journal yet —, I tried moving it to a Google Sheets file. And yes, it sounds weird and counterintuitive at first, but let me talk more about it.
Journaling in Google Sheets
My experience using Google Docs wasn’t for nothing: at least, with that I discovered what worked for me and what didn’t, Bullet Journal-wise. I came up with three premises:
- Write once, display in many places;
- Each information must have a purpose;
- Automate a new week/month creation the maximum as possible.
Using Google Sheets, each Bullet Journal would be a sheet page. The pages navigation on Google Sheets is simple, due to the pages menu button and for the possibility to hide past and unused pages, which is good to reduce the cluttering. There’s even the possibility of a little bit of customization, as you can add a color to a page tab.
And, with that in mind, I came up to the conclusion that my Bullet Journal has, basically, 4 types of pages:
- Year Calendar
- Month View
- Week View
- List
Year Calendar
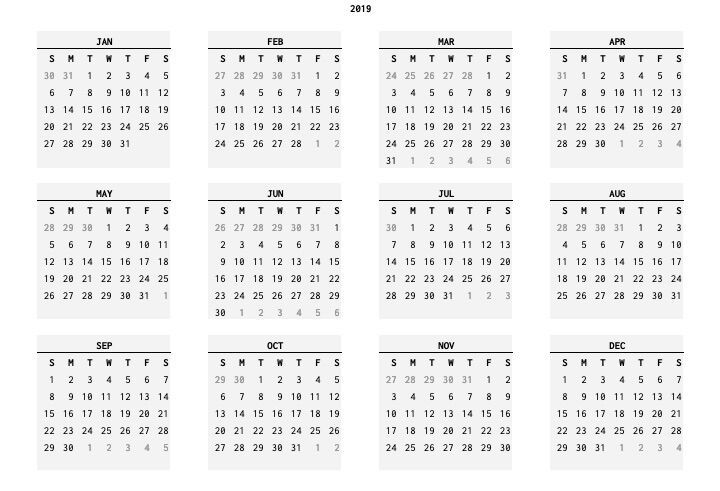
Year Calendar.
A Calendar of the whole year. Despite the fact that this type of page made it to be featured at my second Bullet Journal iteration, I’m thinking about removing this page, as I don’t use it that often. Also, it doesn’t provide any information that isn’t already in another view.
Month View
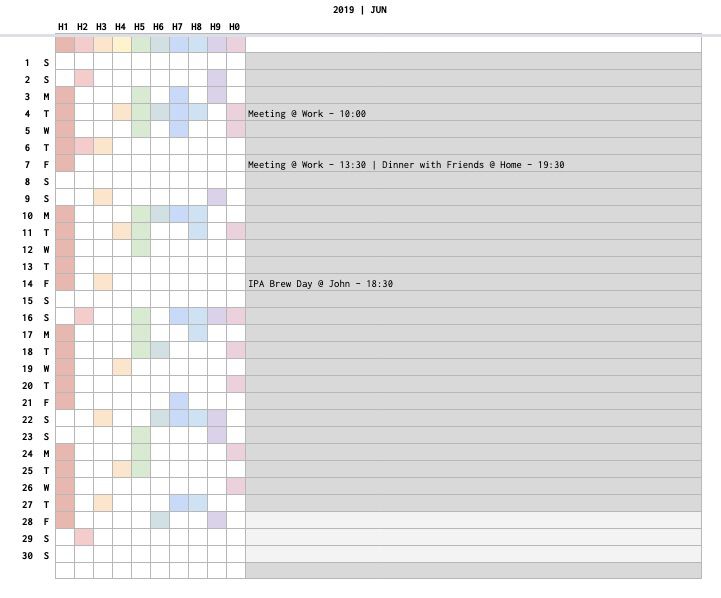
Month View.
The view of a single month. It’s where the appointments are written. Also, I integrated the habit tracker on this view, for the sake of succinctness. In my private Bullet Journal, I identify each habit using a two letter identifier, much like a periodic table element, so “Meditating” would become “Me”. At last, there is some conditional formatting on the appointment fields, as the days that have passed will be grayed out, so you know where to look in the moment that you open the page.
This page is named in the pattern <Year> | <Three letter month identifier>, e.g. 2019 | AUG.
When it’s needed to setup a new month, the process is quite simple. On the bottom of this page, below the fold, there are some metadata that are responsible for making this configuration easier. Having said that, the following steps must be followed:
- Duplicate a month page;
- Remove the appointments and clear the habit tracking data;
- Fill the metadatas: Month’s First Day and Month’s Last Day.
With that, the information regarding the title and the days of the week will be automatically calculated. It may be needed to remove (or add) a day in the month, if it’s a 30 day one, but that’s about it.
Week View
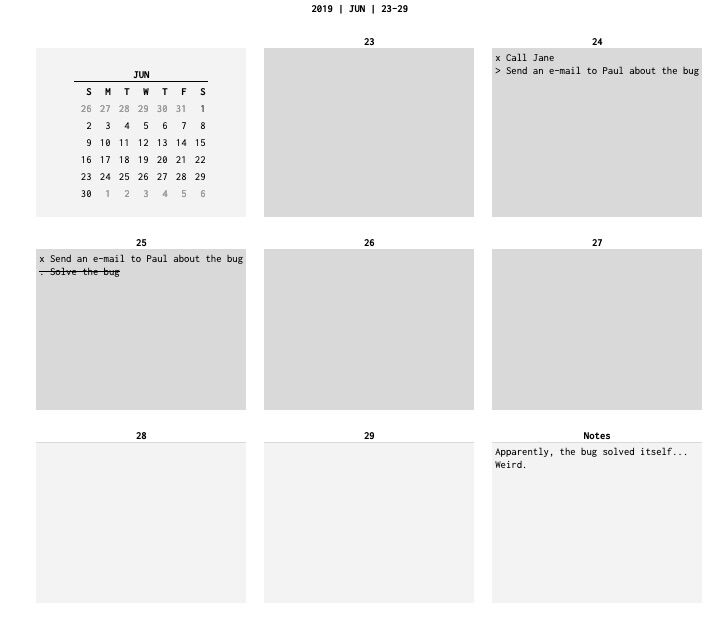
Week View.
The view of a single week, starting in a Sunday. It’s composed of 9 sections: a mini calendar, a blank space for each day of the week and an extra space for random notes. As in the month view, there is some conditional formatting on the daily information fields, as the days that have passed will be grayed out, so you know where to look in the moment that you open the page.
This page is named in the pattern <Year> | <Three letter month identifier> | <First day of the week in a two-digit format>-<Last day of the week in a two-digit format>, e.g. 2019 | AUG | 04-10.
As in the month view, the process of creating a new week page is quite simple. On the bottom of this page, below the fold, there are some metadata that are responsible for making this configuration easier. Having said that, the following steps must be followed:
- Duplicate a week page;
- Remove the information of each day;
- Fill the calendar with the appropriate data (will be less laborious if you keep the Year Calendar on your Bullet Journal, then you can just copy from it);
- Fill the metadata: Week’s First Day.
With that, the information regarding the title and the days that compose the week will be automatically calculated.
List

List View.
A list of, pretty much, anything I need to log: post ideas, things to study, etc.
Normally, its composed of a single column list, but the number of columns may grow as needed. For example, for things to study, you may feel the need to include a “Reference” column.
To create a new list, just copy from an existing one and remove the content.
For now, it’s working
It’s been around 4 months that I’ve been using Bullet Journal and, for now, it’s doing its job. I’m being more accountable on where I spend my time and more focused on how to spend my free time.
I’ll probably try to use it for at least two more months, to see if it really it’s worth the effort, but I’m sure that the fact that the approach I’m following is a digital one is contributing lots to its success.
If you want to try using my template, feel free to make a copy of it. And, if you have any suggestions or comments, please do contact me!